# About

ProjectSend is a free, clients-oriented, private file sharing web application.

<figure><img src="/files/6jBzepF8u1BNLFzO5f0d" alt=""><figcaption></figcaption></figure>

Clients are created and assigned a username and a password.\
Uploaded files can be assigned to specific clients or clients groups.

Other featres include auto-expiration of upload, notifications, full logging of actions by users and clients, option to allow clients to also upload files, themes, multiple languages...

Main website: [projectsend.org](https://www.projectsend.org)\
git: [current repository](https://github.com/projectsend/projectsend/)\
Support via Patreon: [Patreon](https://www.patreon.com/ignacionelson)\
Support via Open Collective: [Open Collective](https://opencollective.com/projectsend)

Feel free to participate!

### IMPORTANT

It is recommended that you download the latest release from the official website.

Downloading a development version directly from the repository might give you unexpected results, such as visible errors, functions that are still not finished, etc.


# Requirements

Your server needs to be configured with at least:

* php 8.1 or newer
* MySQL 5.0 or newer(\*)
* Apache 2.2 or NGINX (recommended)
* The following php extensions enabled on php.ini
  * pdo
  * pdo\_mysql
  * mbstring
  * gettext
  * fileinfo
  * gd2
  * xml
  * zip
* cURL extension is recommended

(\*) If you are using version 8.x or newer, please set the authentication method of your database so it uses the MySQL native password. The default method (caching\_sha2\_password) will not work. Thanks to user jellevdbos for pointing this out.

If possible, make sure to have php configured with:

* memory\_limit set to 128M or more
* post\_max\_size set to 128M or more

If files fail to upload, even small ones, try adding these lines to your config file (includes/sys.config.php) at the top.

```
@ini_set( 'upload_max_size' , '256M' );
@ini_set( 'post_max_size', '256M');
@ini_set( 'max_execution_time', '300' );
```


# Manual installation

Preparations:

1. Download and unzip the latest version of ProjectSend to a folder of your choice, either from <https://www.projectsend.org> or <https://github.com/projectsend/projectsend/releases>.
2. Optionally, check the SHA256 hash against the one featured on the official site.
3. Create a new database on your server. Create and assign a user to it.

When those are steps are completed, follow this instructions:

1. Upload ProjectSend to your selected destination folder.
2. Either:
   * Rename includes/sys.config.sample.php to sys.config.php and set your database information there manually or
   * Skip to next item to generate the file by inputting the data into a form in your browser.
3. Go to <https://your-projectsend-folder/install>
4. Complete the required system and administrator user information there and wait for the correct installation message. If the installer detects folder permissions issues, you will be notified after the tables are created and populated so you can fix the permissions manually.

Congratulations! ProjectSend is now installed and ready for action! You may login with your new username and password.

Note: chown/permissions: for folders should be set to 775 and files to 644.


# Configuration file

ProjectSend uses a configuration file that includes your database connection settings as well as other personal parameters. This file is never included in the app's zip file to make sure yours is not overwritten.

The location of the file is `{root}/includes/sys.config.php`

It is unlikely that you'll need to create this file manually, as the installer will detect if it is missing, and launch a wizard that will help you create it while testing your database credentials at the same time.

If for some reason you decide to create it yourself, a template exists at `{root}/includes/sys.config.sample.php`


# One click installers

Some hosting providers include software like Softaculous or Installatron that can install ProjectSend with one click.&#x20;

In these cases, simply follow the instructions of the hosting's documentation to automatically install ProjectSend.


# Upgrading

1. Download your version of choice from [the official site](https://www.projectsend.org/) or the [github repository](https://github.com/projectsend/projectsend/releases)
2. Upload the files via FTP to your server and replace the ones of the older version.

That's it! Your [personal configuration file](/about/installation/configuration-file) is never included on the downloadable versions, so it will not be replaced while upgrading.

When a system user logs in to the system version, a check for database missing data will be made, and if anything is found, it will be updated automatically and a message will appear under the menu one time only.

Whenever a new version is available, you will be notified in the admin panel.


# Translations

You can download the compiled, translated files for the available languages from [projectsend.org/translations](https://www.projectsend.org/translations/)

Each download will include a zip file that you need to uncompress in the root of your installation. The included files are all the resources available in the project, at this time:

* lang/{translation\_file}.po
* lang/{translation\_file}.mo

And for each of the main templates

* templates/{template}/lang/{translation\_file}.po
* templates/{template}/lang/{translation\_file}.mo

### How to use a new language

All downloaded languages will be available in the switcher in the top bar of your installation. You can switch between any of them by opening the dropdown and selecting you new language for the current session.

To have a language as default for all users and sessions open your configuration file at /includes/sys.config.php with a text editor of your choice.

There, find the line that reads something like this:

**define(‘SITE\_LANG’,’en’);**

And change the value to the name of the file of your language minus the file extension.

For example, if you want to use the French language, change it to

**define(‘SITE\_LANG’,’fr’);**

If your language is localized, like in the case of Portuguese (which has the Brazil and Portugal variations), be sure to include the full name. For example, for Portuguese (Brazil), use

&#x20;**define(‘SITE\_LANG’,’pt\_BR’);**

#### Join a translation team

If you want to translate ProjectSend in your language or work on an existing translation, please join the project on [Transifex](https://www.transifex.com/projects/p/projectsend)


# Advanced: improving downloads

Improve download speed and support resuming by using XSendFile

If you have access to edit your Apache or NGINX sites and configurations, it's recommended that you enable XSendFile (or X-Accel) so the files are served directly, eliminating php as a middle-man, which can be the cause of slow, interrupted downloads, or corrupted files (specially when downloading very large files).

After enabling the module, make sure to also enable the corresponding option in `Options -> General`.

If you are using NGINX, ProjectSend will give you the code that you need to add to your server block.

<figure><img src="/files/1w1dVN8PbwEp6jSnmCDj" alt=""><figcaption><p>Example: X-Accel download method selected for nginx</p></figcaption></figure>

A few resources on how to get started if you are not familiar with X-Accel or XSendFile:

* [mod\_xsendfile for Apache2/Apache2.2](https://tn123.org/mod_xsendfile/)
* [XSendfile on NGINX wiki](https://www.nginx.com/resources/wiki/start/topics/examples/xsendfile/)


# Files

As soon as you set up ProjectSend you can start uploading files (`Files -> Upload`) without the need to have any clients, groups or other users.

### Uploading

ProjectSend uses **plupload**, which handles the uploads in chunks to make sure that even very large files are fully uploaded without the need to set the memory\_limit too high, among other sensitive php settings. This also ensures that large files can be uploaded in almost any server, even those in shared hosting accounts.

Once a file is uploaded an editor will let you specify a title, description, expiry date (optional), categories, and assignations to both clients and groups.

Downloads are tracked so you will always know who downloaded the file and when.

<figure><img src="/files/pwBwmuYcn5hz7JxhCytQ" alt=""><figcaption><p>ProjectSend's file manager</p></figcaption></figure>


# File types restrictions

The editor accepts multiple files at a time and limits the extensions to some predefined, common file types.

You can change these settings in `Options -> Security`. Any file type can be added to the allowed extensions list. Even .php files, but you will get a warning indicating the security risk in doing so.

Another important setting allows you to select who is limited by these extension list. You can enable the restriction for all users and clients, clients only or no one.


# Orphan files

ProjectSend includes a page (`Files -> Find orphan files`) where you can view and import or delete any file that is present in the uploads folder but does not exist in the database.

This is specially useful if you, for example, upload certain files via FTP way to your server directly and want to have control over importing just a subset of them.

Once a file is imported, it can be edited the same way as any file that was directly uploaded via the UI.

The same [file types restrictions](/about/how-to-use/files#allowed-file-types) from regular uploads also apply to orphan files.


# File size limits

By default every installation limits each file to 2GB. This limit can be set to anything you want in two ways:

* To set a new limit globally, edit your [custom configuration file](/about/installation/configuration-file) and change the value *2048* in `define('MAX_FILESIZE','2048');` to the new limit you want, expressed in Mb, where each GB is 1024 Mb. In this case, 2048 represents 2GB. 10GB would be 10240, and so on.
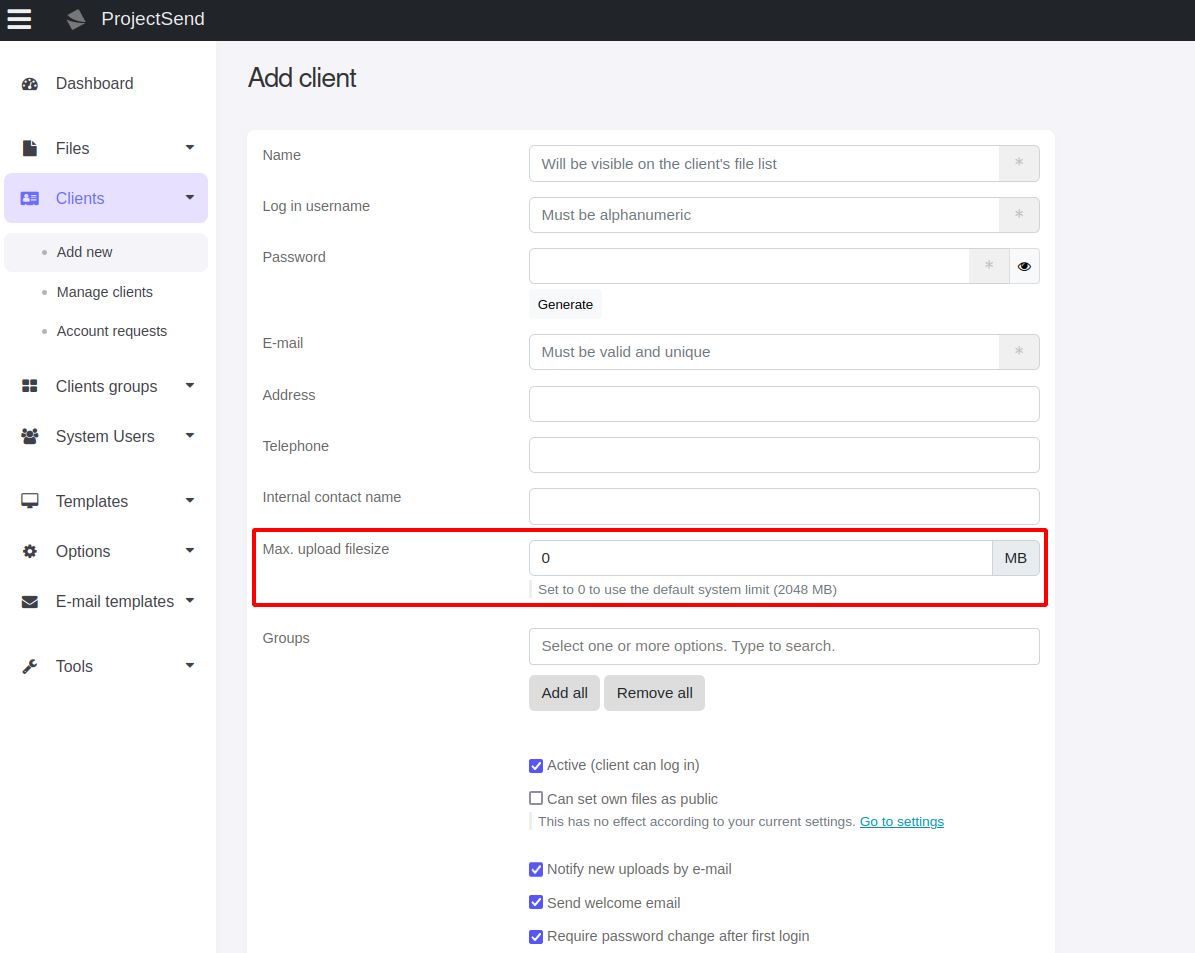
* You can also set specific limits for each user and clients. When editing them, find the File size limit box and set a value in Mb also. For example, you can have a 2GB limit globally but let a certain user upload files up to 10Mb only.

<figure><img src="/files/oyx1K7SZyb1Q1mJN6IQF" alt=""><figcaption></figcaption></figure>


# Categories

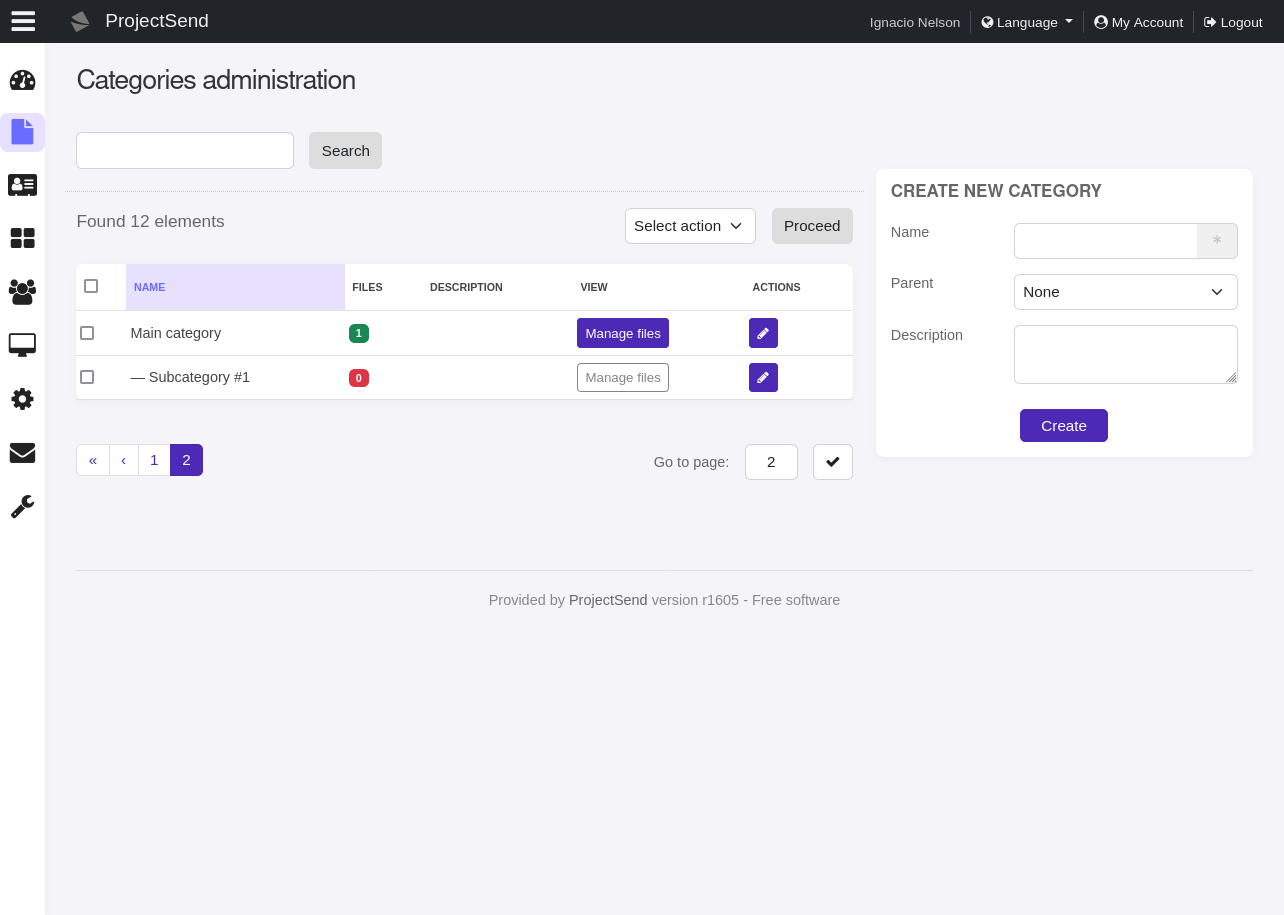
Files categories can be managed by system users only in `Files -> Categories`. Clients do not have access to create them.

**Clients will only be able to view and filter files by categories in which they already have files assigned.**

Each category has a name and description, and optionally a parent or children categories.

<figure><img src="/files/m8Dfrcjx2o2H6BUVZOFt" alt=""><figcaption><p>Categories administration page</p></figcaption></figure>

Taking inspiration from WordPress' UI, the categories administration pages features 2 columns. On the left side you will find the existing categories, ordered hierarchically.

On the right side, a double function form that servers both functiosn to create a new category, as well as the editor when modifying an existing one.


# Users and clients

While both users and clients have usernames and passwords, the difference is quite big in the functions that they can access.

System users are divided into 3 roles: System administrator, Account manager and uploader.

System administrator is the user with all permissions active. They can tweak any part of the system, change any setting, view the full system logs, create users, clients, groups, files categories, etc.

Account managers are similar to administrators, but they lack the possibility to create or edit other users.

Uploaders are much more limited. They can manage categories and files, but will not be able to create users, clients or change settings. In addition, they can be individually limited to upload files to certain clients only.

Clients on the other hand access the system by default by viewing their available files list. They **can be allowed to upload files if the setting for it is enabled**, but won't be able to see private groups, categories that they don't have any files on, manage files for others, etc.

Clients can be created by administrators and account managers, but an option can be enabled to allow self registrations. This is specifically useful if you plan to have a public files repository.


# Creating accounts

When you create or edit an account, you can force the user to change the assigned password after they log in. They will not be able to complete any other action before doing so.

There's also a checkbox to mark a user or client as inactive. This will keep the account and all of its information/uploads in place, but will prevent the user from logging in.

<figure><img src="/files/SIhtyeIge9lDhLyqjmdg" alt=""><figcaption></figcaption></figure>


# Self registration

Self registration is disabled by default. You can enable it by checking the corresponding option in `Options -> clients`

<figure><img src="/files/myXQRzgDZWq26uouVBv6" alt=""><figcaption><p>Clients settings panel</p></figcaption></figure>

If **auto approve new accounts** is not enabled, you can then approve or deny individual account requests in `Clients -> Account requests`

Please note than you can also control which groups clients can request access to, as well as a setting to automatically add new self registered clients to a specific group.


# Groups

System administrators and account managers can create and edit clients groups.

This is an easy way for system users to share files between clients that share something in common without the need to assign a file to each one individually.

A group has a name, an optional description and can contain as many clients as you wish to add.

Groups **are designed to mostly be an organization tool for system users**.&#x20;

**Clients can not see or interact with other members of the groups they belong to.**

They can also NOT assign files to groups. This is reserved for users.

### Public groups

Groups, same as individual files, can also be made public.

The [public listing page](/about/how-to-use/public-files-and-groups) allows clients and visitors to filter files by public groups. A special setting can be enabled to them to list all files assigned to that group, even those files that are not public (in this case, no download link will be provided).

You can also enable an option to let clients request memberships to public groups. This way, files assigned to a public group will immediately be available to the client.

**Public simply means that it can be discovered. Clients are not allowed to assign files to groups, even those that are public.**&#x20;


# Public files and groups

Each file has an option to be made public. By checking it, you will get a unique URL that you can share with anyone to let them download that file without an account. On your log, the download will be recorded as anonymous.

Groups can also be public. By setting the corresponding option `(Privacy -> Public groups and files listings page -> Enable page`) you can enable a landing page that can list all public files and groups for easy navigation and sharing, without the need to share specific files URLs.  There are also options in the same page to enable the repository for known users only, and to let clients mark their own files as public.

<figure><img src="/files/ibveGpaCMXxREKXnFW5t" alt=""><figcaption></figcaption></figure>


# Templates

There are 3 included templates you can select to determine how your clients view their files list.

Templates are also easy to create, so you can make your own if you want to.

Each template can currently set:

* The private files list
* The public files repository
* The public file landing page

More parts will be made editable in the future.

Current included templates:

<div><figure><img src="/files/J9OoHwJlJIvVNinm4Buu" alt=""><figcaption><p>Pinboxes, inspired by Pinterest</p></figcaption></figure> <figure><img src="/files/34aZWQLhHNxoAw6HPrZe" alt=""><figcaption><p>Gallery theme, only shows image files</p></figcaption></figure> <figure><img src="/files/klNULwk2iBieruMo2pN3" alt=""><figcaption><p>Default, same style as the rest of the app</p></figcaption></figure></div>


# E-mail notifications

Some actions will trigger a new email notification that will be sent according to your settings.

You can change the options in `Options -> E-mail notifications`&#x20;

Here you can specify an email to send from, add BCC copies to other emails, set a maxmium retries attempt for each notification in case they fail, and customize your sender/SMTP settings.

A very important setting can be found under the System performance group, with the name **Send "New file" email notifications during the file saving process.**&#x20;

This will prevent ProjectSend to send emails as soon as files are assigned, making the editing process much faster. Be aware that if you enable this setting, it's recommeded that you also s[et up a cron task](/about/how-to-use/cron-tasks) that takes care of sending these emails or neither users or clients will be notified of any new files.


# SMTP settings

It's recommended that you set up the sender either with an SMTP account, or via gmail to improve the chances of reaching inbox instead of being marked as spam.

After you set up your account information, try [testing it with the available tool](/about/how-to-use/e-mail-notifications/testing-email-settings).

Some of the most common errors include using the wrong settings, not enabling the required SSL options or even having the port blocked by your server's firewall (usually on CentOS).


# E-mail templates

As system administrator, you can edit all the templates for the emails that the app can send.

They all share a common header and a footer, and the included editor also gives you access to special tags that will be replaced with the dynamic content at the moment of sending.

These emails include:

* New account information for users and clients
* New uploaded file information
* Account requests approvals/denials status
* Password resets
* 2FA authorization codes

<figure><img src="/files/cg5bxtKvtJ9rwtAYNII7" alt=""><figcaption><p>Example of new user account email template being edited</p></figcaption></figure>


# Testing email settings

Under Tools -> Test email configuration you will find a small utility that will try to send an email to a specified account and return a debug message that you can use to find out any misconfigurations or problems that you may need to correct either in the SMTP settings, or the server itself.

<figure><img src="/files/lRp2nZmBjEvkOOfedMtX" alt=""><figcaption></figcaption></figure>


# Actions log

All actions, by all users and clients (as well as anonymous users in some cases) are recorded in the log so you have a full list of everything that happens in your system.

These actions include uploading, downloading and editing files, creating and editing accounts, groups, categories, changing settings, and so on.

By going into the `Tools -> Actions` log page you can view the full log, filter by action and even download it as csv.


# Cron tasks

Cron tasks can be enabled in `Options -> Scheduled tasks (cron)`&#x20;

The settings panel will provide you with the URL that you must use to execute it, as well as settings to decide which tasks will run.

There's also a security key that must be provided with the URL for validation and can be changed here as well.

Current tasks include:

* Send pending email notifications
* Delete expired files
* Delete [orphan files](/about/how-to-use/files/orphan-files)


# Custom CSS/JS/HTML

If you want to add any custom asset to ProjectSend, you have 2 options to select from:

* [The assets manager](/about/how-to-use/custom-css-js-html/using-the-assets-manager) (recommended)
* [Loading custom files](/about/how-to-use/custom-css-js-html/using-custom-files)


# Using the assets manager

An assets manager is available under `Tools -> Custom HTML/CSS/JS`&#x20;

Here you will be able to create any number of assets that you need and select exactly where you want to apply them.

<figure><img src="/files/XkOHBg5HxIYdRblJD2CH" alt=""><figcaption></figcaption></figure>

### Current assets types:

* HTML
* CSS
* JS

### Current available locations

* Public pages (log in, register, recover password, public listings, public downloads)
* Administration pages
* Files list template (any active one)
* All locations
* All except files list template

### Current available positions

* \<head>
* Immediately after the opening \<body> tag
* Before closing \</body>


# Using custom files

You can create custom css and js files that ProjectSend will load on every request.

**Current files that PS will try to load:**

* {root}/css/custom.css&#x20;
* {root}/assets/css/custom.css
* {root}/includes/js/custom.js
* {root}/assets/custom/custom.js

With this method you cannot control in which locations the file will be loaded, so if you need to restrict it, please use the [assets manager](/about/how-to-use/custom-css-js-html/using-the-assets-manager).


# Debug mode

This is the first step you must take when your instance is returning errors (400, 500) or something just simply does not respond the way you expect

If you are having issues with your installation, the first step will be to enable debug mode and check for error messages on:&#x20;

* Your server's php error log
* The browser console
* The browser's network Tab if an ajax request failed

To enable debug mode, edit [your configuration file](/about/installation/configuration-file) and find this line

`define('DEBUG', false);`

Change the value to true like this

`define('DEBUG', true);`

This will try to enable php's logging and error output features.

If you don't know where the php error log file, you will need to ask your hosting provider for help locating it. In some cases they cannot be enabled on the fly. Just as before, your hosting's support team might be able to enable it for you.


# Checking php errors

After [enabling debug mode](/about/troubleshooting/debug-mode), if your server settings allow it, ProjectSend will enable the output of warnings and errors.&#x20;

While php will most likely log them into an error.log file, there are 2 places inside the app where you can look for visible errors:

* Any regular page will display warnings and fatal errors in the place where they happened. In most cases, parts of the page will be rendered and the error will appear after that. If somehow it's inside an HTML element it might not be visible in the page directly, but you will be able to find it by inspecting the page's code (a regular browser's function).\
  If your server has XDEBUG for php installed and enabled, the output will be easier to read and have even more details.

<figure><img src="/files/24O1YjC7f8XRVDOnQA4R" alt=""><figcaption><p>Warnings, notices and fatal errors can appear in place when debug is properly enabled and php's configuration allows it.</p></figcaption></figure>

* Ajax calls (loading the dashboard widgets, creating a zip file, downloading the actions log, etc) can be found by opening the browser's console and checking the Network tab.\
  Check the following image to see the relevant places: Inside the Network tab, XHR (Ajax) calls were filtered, then a request was selected, inside that call, the response sub-tab was selected and finally the output appeared on the bottom box. In this case, the call did not return any errors, but this is where they can be found if output is enabled.

<figure><img src="/files/QNHdYK0H6m1sNHjQtUYW" alt=""><figcaption><p>Browser's console showing the Response tab inside an ajax request, where errors might appear if the request fails.</p></figcaption></figure>

<br>


# Finding and reporting bugs

Bugs and feature requests can be found in the [Issues tab](https://github.com/projectsend/projectsend/issues) of the repository in Github.

Please do a search before you create a new report, as it might have been solved or asked before.

### Reporting a Vulnerability

Please report security issues to <contact@projectsend.org>


# How to get support

If you have an issue with your ProjectSend instance, the best way to start is by checking the [existing issues in the repository](/about/troubleshooting/finding-and-reporting-bugs). When opening a new report, make sure to be as descriptive as possible so it can be reproduced in other installations.

If you need to have a bug or another issue solved right away, or need any other kind of support or custom development, please send a message to <contact@projectsend.org> with the details to get a quote.


# Collaborate

Please remember that ProjectSend is open source, free software. It is made with love during the hard-to-find free time of mainly one developer.

If you want to collaborate, there are a few ways to do it:

### Donations

With as little as **$2 per month** you can help the project stay active and updated.

You can do it [Monthly via (Patreon)](https://www.patreon.com/ignacionelson) or [One time or monthly via (Open Collective)](https://opencollective.com/projectsend)

### Code contributions

Join the project by forking the development branch in github and submit your merge requests to  help the code base grow!

### Translating

If you want to translate ProjectSend in your language or work on an existing translation, please join the project on [Transifex](https://www.transifex.com/projects/p/projectsend)